After a long day filled with the usual hustle and bustle, there's something comforting about the thought of warm, freshly baked bread. Imagine the soft, pillowy texture and the heavenly aroma gently wafting through your kitchen. Yet, what if I told you that you could achieve this delightful experience without ever turning on your oven?
This is how I discovered the magic of No-Oven Stovetop Bread. One day, I found myself craving homemade bread but was met with the reality of an empty oven—a little inconvenient, to say the least. As luck would have it, a simple skillet was all I needed to whip up a delectable loaf that would impress anyone who dared to take a bite.
With just a few basic ingredients and some patience, you can create a versatile bread that pairs beautifully with soups, stews, or just about any meal. Trust me, it’s a crowd-pleaser that’s not only easy to make but also incredibly satisfying, bringing a touch of warmth to your home without the fuss of traditional baking. So, let’s dive into this delightful recipe, and soon you’ll be savoring homemade goodness straight from your stovetop!
Why You'll Love This No-Oven Stovetop Bread
- You'll love this recipe because it allows you to bake delicious bread without the need for an oven, making it incredibly convenient.
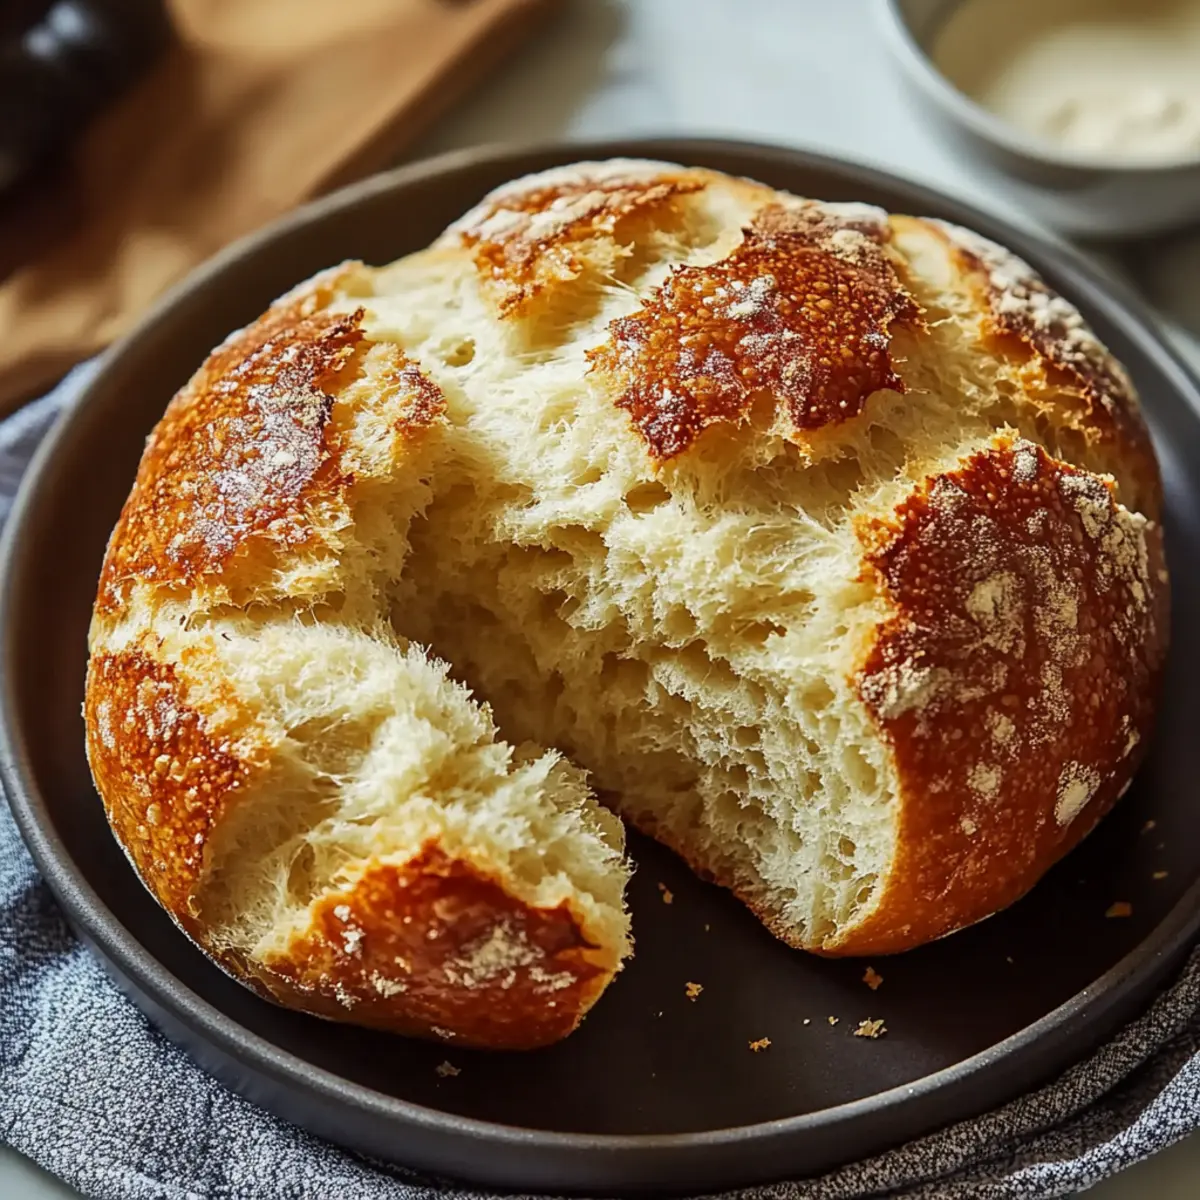
- The soft and fluffy texture combined with the delightful aroma will fill your kitchen and warm your heart.
- This versatile bread complements a wide variety of dishes, transforming any meal into a special occasion.
- Plus, it's a time-saver, with a total preparation time that won't keep you in the kitchen for long.
No-Oven Stovetop Bread Ingredients
For the Dough
• All-purpose flour – Essential for a sturdy yet soft texture; stick with this for best results.
• Warm milk or water – Activates the yeast and helps the dough rise; choose milk for a richer flavor.
• Active dry yeast – The star that gives your No-Oven Stovetop Bread its fluffiness; don't skip this crucial ingredient!
• Granulated sugar – A touch of sweetness to balance flavors and feed the yeast for a good rise.
• Salt – Elevates all the flavors and controls yeast growth; a must for any bread recipe.
• Vegetable oil or butter – Adds richness and moisture; butter will impart a lovely flavor.
Optional Add-Ins
• Herbs or spices – Get creative with your bread! Dried herbs like rosemary or garlic powder can add fantastic flavor.
• Cheese – Fold in some grated cheese for a cheesy twist that takes your stovetop bread to the next level.
• Nuts or seeds – For a delightful crunch, try adding sunflower seeds or walnuts into your dough.
Embrace the magic of making No-Oven Stovetop Bread, and let your culinary creativity shine!

How to Make No-Oven Stovetop Bread
-
Activate the yeast: In a small bowl, combine the warm milk or water, granulated sugar, and active dry yeast. Allow it to sit for about 5-10 minutes until it's frothy. This ensures the yeast is alive and kicking!
-
Mix the dough: In a large bowl, add the all-purpose flour and salt. Pour in the activated yeast mixture along with vegetable oil or melted butter. Stir until combined and then knead on a floured surface until the dough is smooth, approximately 5-7 minutes.
-
Let the dough rise: Place your dough in a lightly greased bowl, covering it with a clean kitchen towel. Let it rise in a warm spot for about 50-60 minutes, or until it doubles in size. You'll know it's ready when it feels puffy to the touch!
-
Cook the bread: Heat a skillet over low heat and lightly grease it. Shape the risen dough into a round loaf and place it in the skillet. Cover and cook for about 15 minutes, until the bottom is golden brown.
-
Flip and finish: Carefully flip the bread using a spatula. Cover again and continue cooking for another 10-15 minutes, until the second side is golden and the bread sounds hollow when tapped.
Optional: Sprinkle with herbs or garlic powder for an extra flavor boost!
Exact quantities are listed in the recipe card below.
What to Serve with No-Oven Stovetop Bread?
Create a comforting meal that dances on the taste buds with textures and flavors that elevate every bite.
-
Hearty Soup: A warm, savory bowl of vegetable or chicken soup perfectly complements the bread's soft texture, making each bite a delightful experience.
-
Garlic Butter Spinach: Sautéed spinach with garlic and butter adds a fresh, vibrant flavor that balances the bread's richness, with each bite bursting with green goodness.
-
Savory Stew: A thick, hearty stew will embrace the bread, allowing you to scoop and savor the juices with every slice. It transforms any meal into a cozy gathering.
-
Mixed Green Salad: A crisp mixed salad with tangy vinaigrette lightens the meal while providing a refreshing contrast to the soft, fluffy bread.
-
Cheese Platter: Pair with a selection of cheeses, like creamy brie or sharp cheddar, to create a sublime tasting experience that elevates simple bites of bread.
-
Homemade Jam: Sweet and fruity jam spread on warm slices is a treat, turning your stovetop bread into a delightful breakfast or afternoon snack.
-
Roasted Vegetables: Enjoy roasted seasonal vegetables drizzled with olive oil and herbs; their caramelized flavors make a perfect match for bread's comforting qualities.
-
Chilled White Wine: A crisp, chilled Sauvignon Blanc or Chardonnay enhances the meal while refreshing the palate, adding a touch of sophistication to your dinner table.
No-Oven Stovetop Bread Variations
Get ready to put your own spin on this delightful bread and make it truly your own!
-
Whole Wheat: Substitute half the all-purpose flour with whole wheat flour for a nutty taste and extra fiber.
-
Gluten-Free: Use a gluten-free flour blend to make this bread suitable for gluten-sensitive diners. Look for blends designed for baking!
-
Herb-Infused: Add 2 tablespoons of chopped fresh herbs like rosemary or thyme into the dough for a fragrant twist that elevates the flavor.
-
Cheesy Delight: Mix in 1 cup of shredded cheese, such as cheddar or mozzarella, to create a cheesy, savory treat that's irresistible.
-
Sweet Twist: Incorporate 1-2 tablespoons of honey or maple syrup into the dough for a hint of sweetness, perfect for breakfast or tea time.
-
Spicy Kick: Add a teaspoon of red pepper flakes or chopped jalapeños for a spicy version that pairs perfectly with soups and stews.
-
Nutty Crunch: Fold in ½ cup of mixed nuts or seeds, like sunflower seeds or chopped walnuts, to enhance texture and add a healthy boost.
-
Cinnamon Sugar: For a sweeter version, sprinkle a mixture of cinnamon and sugar on the dough before cooking, creating a delightful dessert bread.
Feel free to explore these variations and discover new favorite flavors in your homemade No-Oven Stovetop Bread!
Make Ahead Options
Preparing your No-Oven Stovetop Bread ahead of time can make your meal planning a breeze! You can mix and knead the dough up to 24 hours in advance; simply store it in a greased bowl, cover it tightly with plastic wrap, and refrigerate to prevent it from rising too fast. When you're ready to cook, let the dough sit at room temperature for about 30 minutes before shaping, ensuring it's warm and pliable. Alternatively, you can shape the loaf and refrigerate it, covered, for up to 2 days before cooking. Just remember to gently re-knead it if it develops any air bubbles. This way, your No-Oven Stovetop Bread will rise beautifully and taste just as delicious, giving you warm, homemade goodness with minimal effort when it’s time to serve!
How to Store and Freeze No-Oven Stovetop Bread
Room Temperature: Store bread in a breadbox or wrapped in a clean kitchen towel for up to 3 days to keep it fresh and soft.
Fridge: If you need it to last longer, refrigerate in an airtight container for up to 5 days. Be aware that refrigeration can somewhat dry out the texture.
Freezer: For longer storage, wrap individual slices or the whole loaf tightly in plastic wrap, then in aluminum foil. Freeze for up to 2 months.
Reheating: Thaw bread in the fridge overnight or at room temperature. Reheat in a skillet over low heat or in a toaster until warm. Enjoy the delightful taste of your No-Oven Stovetop Bread!
Chef's Helpful Tips
- When making No-Oven Stovetop Bread, always ensure your warm milk or water is between 100-110°F to effectively activate the yeast.
- Avoid over-kneading your dough as this can lead to a tougher texture; knead just until it is smooth and elastic.
- For best flavor infusion, consider letting the dough rise in a warm, draft-free area, which could take about 50-60 minutes.
- Lastly, keep a close eye on your skillet while cooking, adjusting the heat as necessary to achieve a perfect golden-brown crust without burning.
No-Oven Stovetop Bread Recipe FAQs
How do I know if my yeast is still good?
To check if your yeast is active, mix it with warm water or milk and a teaspoon of sugar. Wait about 5-10 minutes; if it becomes frothy and bubbly, your yeast is alive and ready to go! If it doesn't bubble, it's time to buy fresh yeast.
What is the best way to store No-Oven Stovetop Bread?
Absolutely! To keep your No-Oven Stovetop Bread fresh, store it at room temperature in a breadbox or wrapped in a clean kitchen towel for up to 3 days. For longer storage, you can refrigerate it in an airtight container for up to 5 days, although this may slightly dry it out.
Can I freeze No-Oven Stovetop Bread?
Very! To freeze your bread, wrap it tightly in plastic wrap. For added protection, wrap it in aluminum foil or place it in a freezer-safe bag. It can be frozen for up to 2 months to maintain its flavor and texture. When you’re ready to enjoy it, simply thaw it at room temperature overnight.
Why is my bread dense, and how can I fix it?
Sometimes, bread can turn out dense due to insufficient flour, too much salt, or not allowing it to rise enough. If the dough feels heavy, try adding a tiny bit more flour while kneading and ensure it has ample time to rise—about 50-60 minutes until doubled in size. Patience is key!
Is this recipe suitable for those with gluten allergies?
This recipe isn't gluten-free, but you can certainly experiment! If you're gluten-sensitive, you can substitute all-purpose flour with a gluten-free flour blend designed for baking. Be sure to check that other ingredients like yeast and additional add-ins are also gluten-free for a safe treat!
Can I add flavors to my No-Oven Stovetop Bread?
Absolutely! You can enhance your bread by adding herbs, garlic powder, or cheese to the dough after the first rise. Simply knead the extras in gently before cooking, and enjoy a flavorful twist to your stovetop bread!
No-Oven Stovetop Bread
Ingredients
Equipment
Method
- Activate the yeast: In a small bowl, combine the warm milk or water, granulated sugar, and active dry yeast. Allow to sit for 5-10 minutes until frothy.
- Mix the dough: In a large bowl, add the flour and salt. Pour in the activated yeast mixture and oil/butter. Stir and knead for 5-7 minutes until smooth.
- Let the dough rise: Place the dough in a greased bowl, cover, and let rise for 50-60 minutes until doubled.
- Cook the bread: Heat a skillet over low heat, grease it, shape the dough into a loaf, and cook covered for about 15 minutes until golden.
- Flip and finish: Carefully flip the bread and cook for another 10-15 minutes until the second side is golden and sounds hollow.


Leave a Reply