There's something truly special about the first bite of a freshly baked pie, especially when the crust is made from scratch. I discovered the secret to creating the ultimate gluten-free pie crust while trying to impress a few friends with dietary restrictions. You know that moment when the aroma of buttery goodness fills your kitchen, and you can't help but smile, knowing you’re about to serve a delicious treat that everyone can enjoy? This crust is not only incredibly flaky and flavorful but also easy to whip up!
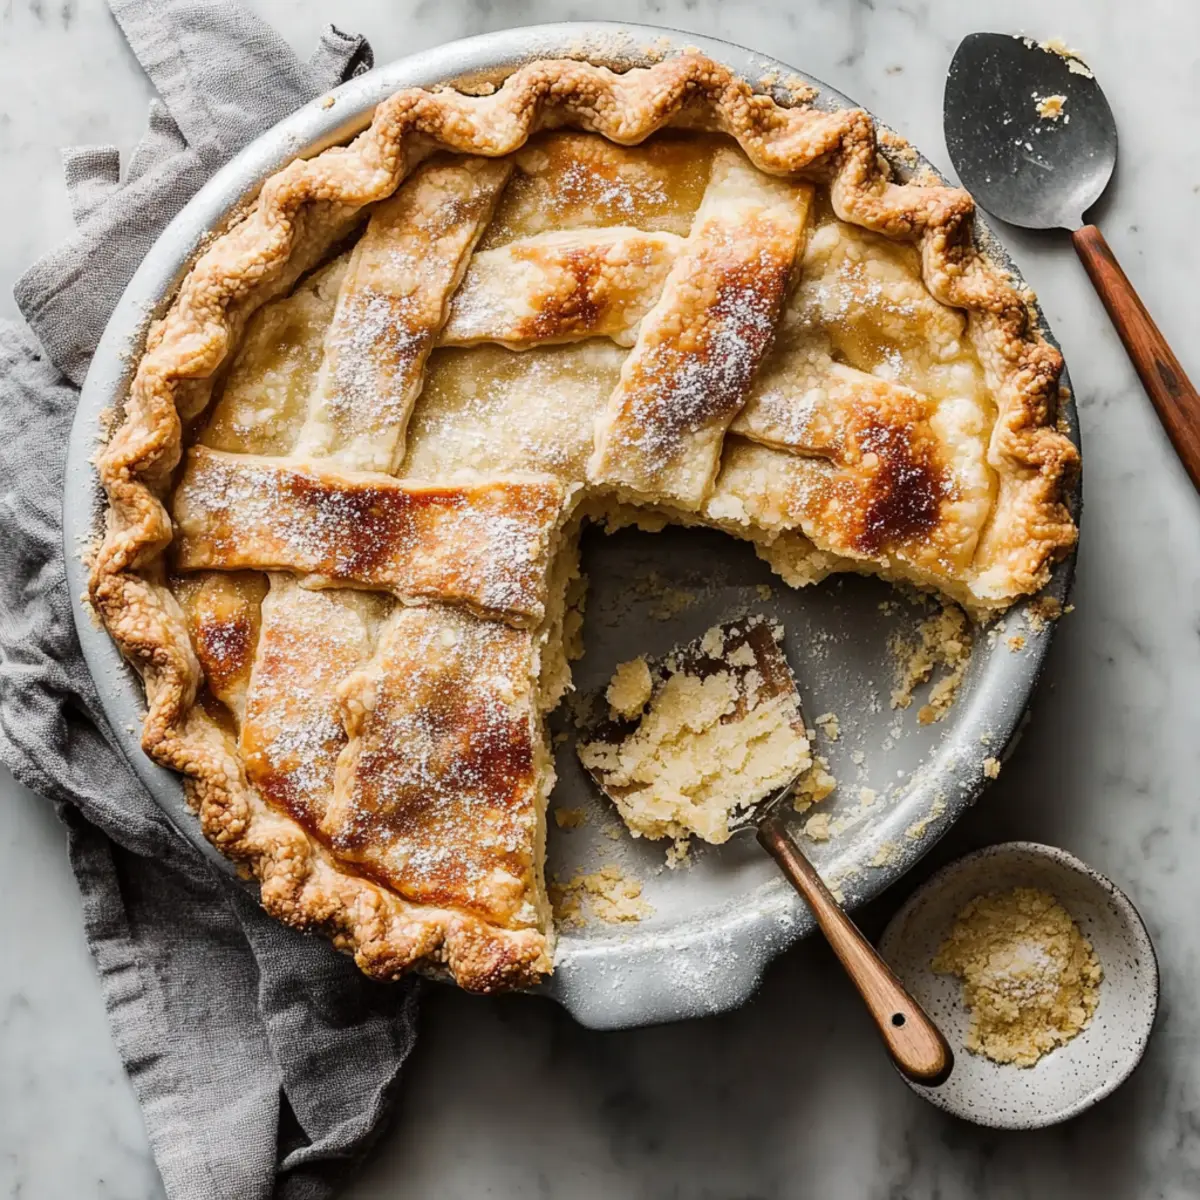
With just a few simple ingredients you probably already have on hand, you can say goodbye to store-bought options that often fall flat. Whether you're planning a classic apple pie or a savory quiche, this versatile crust is here to elevate your baking game. Perfectly crisp on the outside and perfectly tender on the inside, it’s bound to become a staple in your kitchen. So roll up your sleeves and let’s dive into making this delightful pie crust that will have everyone asking for seconds!
Why You'll Love This The Ultimate Gluten-Free Pie Crust
- This recipe is incredibly easy to make, allowing you to create a delicious pie crust without any fuss.
- You'll be amazed by the rich, buttery flavor that will enhance any pie filling you choose.
- The versatility of this crust means you can use it for sweet or savory dishes, making it perfect for any occasion.
- Visually, this crust is stunning, with a golden-brown finish that will impress your guests and look beautiful on the table.
The Ultimate Gluten-Free Pie Crust Ingredients
For the Crust
• Gluten-free all-purpose flour blend – This blend should include xanthan gum for the best texture.
• Granulated sugar – Optional, but it adds a hint of sweetness for dessert pies.
• Salt – Essential for enhancing the overall flavor of your crust.
• Unsalted butter – Very cold and cubed; it gives the crust its flaky, tender goodness.
• Large egg – Binds the ingredients together and adds richness.
• Apple cider vinegar – A secret ingredient that helps tenderize the dough.
• Ice water – Adds moisture to form the dough without warming it up too much.
With these simple ingredients for The Ultimate Gluten-Free Pie Crust, you're just moments away from achieving pie perfection that caters to everyone's dietary choices!

How to Make The Ultimate Gluten-Free Pie Crust
-
Whisk Together: In a large bowl, whisk the gluten-free all-purpose flour blend, sugar, and salt until everything is well combined. This step sets the foundation for a well-balanced crust.
-
Cut in Butter: Using a pastry cutter or your hands, cut the very cold, cubed butter into the flour mixture. Continue until it resembles coarse crumbs with pea-sized pieces, ensuring a flaky texture.
-
Mix Wet Ingredients: In a separate bowl, whisk together the egg and apple cider vinegar. Pour this mixture into the dry ingredients and gently fold until just combined.
-
Add Ice Water: Incorporate the ice water one tablespoon at a time. Mix until the dough holds together but isn’t sticky. This cold water is key to achieving the right consistency.
-
Form and Chill Dough: Shape the dough into a disk, wrap it in plastic wrap, and refrigerate for at least one hour. Chilling helps the crust maintain its shape during baking.
-
Roll Out Dough: After chilling, roll out the dough between two sheets of parchment paper. This prevents sticking and allows for easy transport to your pie dish.
-
Transfer to Pie Dish: Carefully lift the rolled-out dough and transfer it to your pie dish, pressing it gently into the bottom and sides. Trim any excess dough hanging over the edges.
-
Pre-Bake the Crust: Chill the crust for 20-30 minutes before blind baking it at 375°F for 15 minutes with weights. Then, remove the weights and bake for an additional 10–15 minutes until it’s golden brown.
Optional: Serve with a sprinkle of sea salt for a sophisticated touch!
Exact quantities are listed in the recipe card below.
Gluten-Free Pie Crust Variations
Feel free to get creative and customize this crust to suit your taste or dietary needs!
-
Dairy-Free: Substitute cold butter with coconut oil or vegan butter for a dairy-free alternative that still packs flavor. The crust will have a slightly different texture but remains delicious!
-
Herb-Infused: Add 1-2 teaspoons of dried herbs like rosemary or thyme to the flour mixture for a savory twist. This herbaceous flavor adds an aromatic touch, perfect for quiches.
-
Nutty Flavor: Mix in ½ cup of finely ground almond flour with the gluten-free flour. This not only adds a magical nuttiness but also enhances the texture, making it even more delightful.
-
Sweeten It Up: For dessert versions, add 2 tablespoons of powdered sugar to the dry ingredients. This subtle sweetness makes the crust extraordinary for pies filled with fruits or custards.
-
Texture Boost: Fold in ¼ cup of finely crushed gluten-free cookies or graham crackers after step 3 for a crunchy surprise. This creates an interesting texture and a flavorful base for sweet pies!
-
Spicy Kick: Stir in a pinch of cayenne or chili powder to the flour for a subtle heat. This unexpected twist pairs beautifully with rich fillings, creating layers of flavor.
-
Cocoa Mix-In: For chocolate desserts, incorporate ¼ cup of unsweetened cocoa powder into the flour mixture. The result is a rich, chocolate-infused crust that’s perfect for decadent pies!
-
Maple Infusion: Swap the granulated sugar for maple sugar or maple syrup for a unique flavor profile. This sweet swap can add fragrances of fall, enhancing your desserts beautifully.
Make Ahead Options
These tips for The Ultimate Gluten-Free Pie Crust are perfect for busy home cooks looking to save time in the kitchen! You can prepare the dough up to 24 hours in advance. Simply follow the steps to make the dough, shape it into a disk, wrap it tightly in plastic wrap, and refrigerate. For best results, ensure the crust is well sealed to prevent any drying out. On the day you're ready to bake, allow the chilled crust to sit at room temperature for about 10-15 minutes, then roll it out and proceed with the pre-baking instructions. This way, you’ll have a delicious, flaky pie crust ready with minimal effort and just as delightful as if you made it fresh!
What to Serve with The Ultimate Gluten-Free Pie Crust?
There's nothing quite like a freshly baked pie, and pairing it well can elevate your culinary experience.
-
Seasonal Fruit Filling: A tart cherry or sweet peach filling complements the buttery crust perfectly, balancing sweetness with a hint of tang. The vibrant colors also bring a lovely visual appeal to your dessert table.
-
Savory Quiche: A creamy quiche filled with cheese and seasonal vegetables is a comforting choice. The flaky crust beautifully encases the rich filling, making each slice a delightful blend of textures.
-
Chocolate Ganache: For dessert lovers, spreading a luscious chocolate ganache over the baked crust creates an indulgent treat. The richness of chocolate against the buttery crust is simply divine, sure to satisfy any sweet tooth.
-
Lemon Curd: This bright and zesty filling offers a refreshing contrast. Its vibrant flavor reflecting sunshine will light up any dessert occasion, making it a fantastic spring or summer choice!
-
Fresh Berries: Topping the baked crust with mixed berries and a dollop of whipped cream brings a light, fresh finish. The juicy berries not only taste delightful but also add a burst of color.
-
Ice Cream: Serving a slice of pie with a scoop of vanilla ice cream creates a comforting classic. The creamy texture melts into the warm pie, creating an irresistible blend of flavors.
-
Herbal Tea or Coffee: Pair your pie with a warm cup of herbal tea or freshly brewed coffee. The subtle flavors help to enhance the overall dining experience, perfect for cozy gatherings.
How to Store and Freeze The Ultimate Gluten-Free Pie Crust
Room Temperature: Once baked, allow the crust to cool completely, then store at room temperature for up to 2 days, covered with a clean kitchen towel to prevent it from getting stale.
Fridge: If you have leftover dough or a crust, wrap it tightly in plastic wrap and refrigerate for up to 3 days, ensuring it stays moisture-free.
Freezer: For longer storage, freeze the unbaked pie crust by wrapping it in plastic wrap and then aluminum foil. It can be kept for up to 3 months. Thaw in the refrigerator before using.
Reheating: When ready to serve your stored crust, bake at 375°F for about 10 minutes if pre-baked, or follow the original baking instructions for unbaked plastic wrap to enjoy that perfect flaky texture again!
Chef's Helpful Tips
- For The Ultimate Gluten-Free Pie Crust, always ensure your butter is extremely cold to achieve that desired flaky texture in your crust.
- A common mistake is overworking the dough; mix just until combined for the best results.
- When it comes to adding ice water, adding it one tablespoon at a time helps maintain the right consistency without making the dough sticky.
- Additionally, letting your crust chill for at least one hour is crucial, as this will help it hold its shape during baking.
- Be sure to pre-bake your crust until it is golden brown for the best flavor and texture.
The Ultimate Gluten-Free Pie Crust Recipe FAQs
What type of gluten-free flour blend should I use?
Absolutely! For the best results, choose a gluten-free all-purpose flour blend that includes xanthan gum. This ingredient is crucial for mimicking the elasticity found in traditional wheat flour, ensuring that your pie crust holds together beautifully.
How should I store leftover pie crust?
If you have any leftover dough or a baked crust, wrap it tightly in plastic wrap. You can refrigerate it for up to 3 days. I find that keeping it moisture-free is key to maintaining its wonderful texture and flavor!
Can I freeze the unbaked pie crust?
Very! To freeze, simply wrap the unbaked pie crust in plastic wrap and then cover it with aluminum foil to prevent freezer burn. It can be stored for up to 3 months. Remember to thaw it in the refrigerator before baking, which helps keep the crust flaky.
What if my pie crust is too crumbly?
No worries! A common issue is that the crust can be crumbly if there isn’t enough moisture. If this happens, sprinkle in a little more ice water—start with just a teaspoon at a time—and gently mix until the dough holds together. Overworking the dough can lead to tough crusts, so mix just until combined.
Can my dog eat this pie crust?
While the pie crust contains simple ingredients, it's best to keep it away from pets. The butter can be too rich for their stomachs, and the salt isn’t good for them in larger quantities. Always check with your vet before sharing any human food with your furry friends to ensure it’s safe!
How long can I keep a baked pie crust at room temperature?
Once your pie crust is baked and cooled completely, you can store it at room temperature for up to 2 days. Just cover it with a clean kitchen towel to keep it fresh and prevent it from becoming stale. Enjoy a slice anytime you crave that buttery goodness!
These handy tips should help you navigate the ins and outs of making The Ultimate Gluten-Free Pie Crust with confidence. Happy baking!
The Ultimate Gluten-Free Pie Crust
Ingredients
Equipment
Method
- In a large bowl, whisk the gluten-free all-purpose flour blend, sugar, and salt until well combined.
- Using a pastry cutter or your hands, cut the very cold, cubed butter into the flour mixture until it resembles coarse crumbs.
- In a separate bowl, whisk together the egg and apple cider vinegar. Pour this mixture into the dry ingredients and gently fold until just combined.
- Incorporate the ice water one tablespoon at a time, mixing until the dough holds together but isn't sticky.
- Shape the dough into a disk, wrap it in plastic wrap, and refrigerate for at least one hour.
- After chilling, roll out the dough between two sheets of parchment paper.
- Carefully lift the rolled-out dough and transfer it to your pie dish, pressing gently into the bottom and sides.
- Chill the crust for 20-30 minutes before blind baking at 375°F for 15 minutes with weights, then remove weights and bake for an additional 10-15 minutes until golden brown.
Leave a Reply