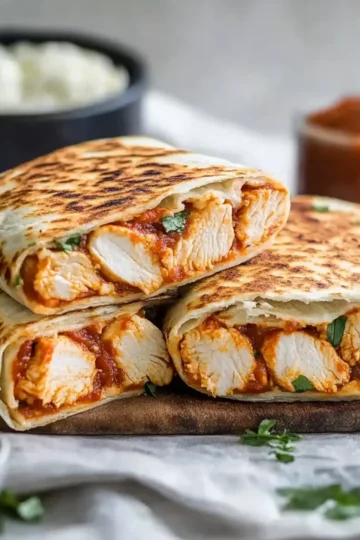
There’s a certain joy in creating comforting meals that come together with a simple flick of the wrist and a dash of creativity. Imagine the enticing blend of flavors as you bite into a Homemade Grilled Cheese Burrito—crispy on the outside, melting with gooey cheese and savory beef on the inside. This delightful dish became an instant favorite in my household after a busy week when cooking felt like a chore. It was one of those moments when a craving strikes, and you realize that an epic meal doesn't need to take hours.

I stumbled upon this creative twist on the classic grilled cheese while searching for something to elevate my weeknight dinners. Not only is it packed with protein and flavor, but it also offers versatility—perfect for customizing with your favorite chips or salsa. Whether you're feeding the family or impressing friends at a casual get-together, this burrito hits the mark every time. So, let’s dive into this deliciousness and embrace the magic of cooking from home!
Why You'll Love This Homemade Grilled Cheese Burrito
- This Homemade Grilled Cheese Burrito is incredibly easy to make, allowing you to whip up a tasty meal in just 30 minutes.
- The combination of melty cheeses and seasoned beef creates an explosion of flavor that everyone will love.
- Its versatility lets you customize it with your favorite toppings like avocado or jalapeños, making it perfect for any taste.
- Plus, the golden, crispy exterior is visually appealing and sure to impress your family and friends at any gathering.
Homemade Grilled Cheese Burrito Ingredients
For the Filling
• Ground beef – a quick and hearty protein base for your burrito.
• Taco seasoning – adds a burst of zesty flavor that elevates this dish.
• Cooked rice – helps to stretch the filling and adds texture.
• Shredded cheddar cheese – provides a sharp, creamy taste that's a classic choice.
• Shredded mozzarella or Monterey Jack – offers a gooey, melt-in-your-mouth experience.
• Nacho cheese sauce – brings an indulgent, cheesy richness to each bite.
• Sour cream – adds a tangy finish that balances the flavors perfectly.
For the Wrap
• Large flour tortillas – soft and pliable, perfect for wrapping all your delicious ingredients.
This Homemade Grilled Cheese Burrito is sure to satisfy your cravings for comfort food!

How to Make Homemade Grilled Cheese Burrito
-
Cook Beef: In a skillet over medium heat, brown 1 lb of ground beef until it's no longer pink. Drain any excess fat and mix in the taco seasoning until well distributed, letting those flavors meld together.
-
Warm Tortillas: Heat your large flour tortillas gently on a skillet or in the microwave for about 20 seconds. This softens them and makes it easier to fold without cracking.
-
Fill Tortillas: Lay out the warmed tortillas, then fill each one with an easy combination of 2 cups cooked rice, the seasoned beef, 1.5 cups shredded cheddar cheese, and 0.5 cup nacho cheese sauce. Don't forget a dollop of sour cream for a creamy bite!
-
Roll Tightly: Fold the sides inward, then carefully roll the tortilla from the bottom to the top, ensuring your delicious fillings are secure inside.
-
Grill Burritos: Sprinkle a little extra cheese onto a heated nonstick skillet. Place the burrito seam-side down in the skillet, cooking for about 3-4 minutes until the cheese forms a golden crust. Gently rotate to achieve an even grill.
-
Slice and Serve: Once golden and crispy, remove the burrito from the skillet. Allow to cool slightly, then slice in half to reveal the gooey, cheesy goodness inside. Serve hot and enjoy every bite!
Optional: Serve with fresh salsa or guacamole for an extra layer of flavor.
Exact quantities are listed in the recipe card below.
Make Ahead Options
These Homemade Grilled Cheese Burritos are perfect for meal prep enthusiasts who desire hassle-free weeknight dinners! You can prepare the filling (ground beef, rice, cheeses, and sour cream) up to 3 days in advance and store it in an airtight container in the refrigerator, ensuring everything stays fresh and flavorful. When you're ready to enjoy your meal, simply warm the tortillas, fill them with your prepped ingredients, and grill for about 3-4 minutes until golden. To maintain the burritos’ quality, avoid pre-grilling them to ensure that the cheese gets perfectly melted when you cook them fresh. With this make-ahead option, you'll savor a delicious meal with minimal effort—perfect for busy evenings!
Homemade Grilled Cheese Burrito Variations
Feel free to unleash your creativity and take this recipe to new heights with these delightful variations!
-
Vegetarian: Substitute the ground beef with black beans or lentils for a hearty, plant-based twist.
Explore the vibrant flavors of spices and fillings—your veggie-loving friends will be thrilled! -
Spicy: Add diced jalapeños or a sprinkle of red pepper flakes to the beef mixture.
This simple adjustment will ignite your taste buds and give the burrito a zesty kick that you’ll crave! -
Cheesy: Incorporate a blend of pepper jack and gouda for a rich, melty experience.
This combination invites a delightful creaminess that perfectly complements each bite. -
Taco-Style: Layer in chopped romaine lettuce and diced tomatoes for a fresh, crunchy taco flavor.
These additions not only brighten the burrito but also make it feel light and refreshing. -
Gluten-Free: Use corn tortillas instead of flour tortillas for a gluten-free option.
They might be a bit more delicate but will still deliver all that cheesy goodness packed inside! -
Extra Crunch: Serve with crispy tortilla strips or crushed corn chips inside the burrito.
This fun crunch adds a surprising texture that will keep everyone reaching for seconds. -
Breakfast Burrito: Swap ground beef for scrambled eggs and add diced bell peppers and onions.
This breakfast twist will turn your next morning into a delightful feast that starts the day right! -
Creamy Avocado: Top with slices of ripe avocado or guacamole right before serving.
The creaminess of avocado balances out the savory richness and adds a delicious layer of flavor.
How to Store and Freeze Homemade Grilled Cheese Burrito
Fridge: Store leftover burritos in an airtight container for up to 3 days. Reheat in the microwave for 1-2 minutes or on a skillet until warmed through, ensuring the cheese is melty.
Freezer: Wrap each burrito tightly in plastic wrap and aluminum foil, then freeze for up to 2 months. Thaw in the fridge overnight before reheating, or cook from frozen in a skillet.
Reheating: For even heating, place thawed burritos in a preheated oven at 350°F (175°C) for about 15-20 minutes. This keeps the burrito's exterior crispy while rewarming the filling inside.
Room Temperature: Avoid leaving burritos at room temperature for more than 2 hours to prevent spoilage.
What to Serve with Homemade Grilled Cheese Burrito?
Enhance your meal experience with these delightful dishes that perfectly accompany the crispy, cheesy goodness of the burrito.
-
Fresh Garden Salad: A light and refreshing mix of greens, tomatoes, and cucumbers adds a crunchy contrast to the burrito’s richness.
-
Guacamole: Creamy and rich, this avocado dip complements the savory flavors while providing a cooling effect.
-
Pico de Gallo: This fresh salsa offers a zesty kick that perfectly balances the burrito's melted cheese and seasoned beef.
-
Spanish Rice: Flavored with garlic and spices, it enhances the burrito's Mexican flair, creating a cohesive meal that delights the palate.
-
Corn on the Cob: Sweet and juicy corn brushed with butter is a perfect side to balance the savory burrito with a bit of sweetness.
-
Chips and Salsa: Crunchy tortilla chips dipped in tangy salsa provide a fun and easy appetizer to nibble on while you enjoy your burrito.
-
Sour Cream Drizzle: A light drizzle on top of your burrito adds an extra creamy layer of flavor and feels indulgent.
-
Cucumber Lemonade: An ice-cold, refreshing drink to wash down the burrito's richness and add a zesty flavor to your meal.
Chef's Helpful Tips
- To ensure your ground beef for the Homemade Grilled Cheese Burrito is perfectly seasoned, allow it to brown well before adding the taco seasoning for more depth of flavor.
- Always warm your tortillas in a skillet or microwave briefly to prevent cracking when rolling them.
- When filling your tortillas, avoid overstuffing to ensure they fold easily and seal securely.
- When grilling, keep the heat at medium to allow the cheese to melt and form a golden crust without burning the tortilla.
Homemade Grilled Cheese Burrito Recipe FAQs
How do I choose ripe ingredients for my Homemade Grilled Cheese Burrito?
Absolutely! For the best flavor, use fresh vegetables if you're adding any. Look for vibrant colors and firm textures. For instance, tomatoes should be slightly soft to the touch, showing some ripeness, and avocados should yield gently when squeezed. Using high-quality cheese is also crucial; you want creamy cheese without any dark spots or excessive dryness.
What is the best way to store leftover burritos?
You can store leftover Homemade Grilled Cheese Burritos in an airtight container in the refrigerator for up to 3 days. Just be sure to seal them well to maintain their freshness. If you're reheating, either microwave them for 1-2 minutes or warm them on a skillet until the cheese melts, which will give you that delightful gooey texture again!
Can I freeze my Homemade Grilled Cheese Burritos?
Absolutely! To freeze, wrap each burrito tightly in plastic wrap and then in aluminum foil. This double wrapping prevents freezer burn and keeps your burrito fresh for up to 2 months. Thaw in your refrigerator overnight before reheating, or cook directly from frozen in a skillet over medium heat until heated through, about 10-15 minutes.
What if my burritos are difficult to roll or are cracking?
Very good question! If your tortillas are cracking, it can help to warm them slightly longer. Either heat them in a skillet or microwave for about 30 seconds to make them more pliable. Make sure not to overfill them, as that can also lead to cracking. If they still won’t roll well, layering the filling in a circular pattern might help distribute the weight better.
Are there any dietary considerations I should keep in mind?
Definitely! If you're preparing these for a crowd, be mindful of common allergies, such as gluten in the tortillas and dairy in the cheese and sour cream. Opt for gluten-free tortillas to make this dish suitable for gluten-sensitive individuals. Additionally, for lactose intolerant guests, consider using dairy-free cheese and sour cream alternatives. I often customize for dietary needs and love seeing how different adjustments can still create a delicious meal!
How long can I leave burritos at room temperature?
It's best to avoid leaving your Homemade Grilled Cheese Burritos at room temperature for more than 2 hours to prevent spoilage. If you're having a gathering, store them in a warming tray or covered in a warm spot until you're ready to serve. That way, you can enjoy them hot and fresh without worry!
Homemade Grilled Cheese Burrito
Ingredients
Equipment
Method
- In a skillet over medium heat, brown 1 lb of ground beef until it's no longer pink. Drain any excess fat and mix in the taco seasoning.
- Heat your large flour tortillas gently on a skillet or in the microwave for about 20 seconds.
- Lay out the warmed tortillas, then fill each one with an easy combination of 2 cups cooked rice, the seasoned beef, 1.5 cups shredded cheddar cheese, and 0.5 cup nacho cheese sauce. Add a dollop of sour cream.
- Fold the sides inward, then carefully roll the tortilla from the bottom to the top.
- Sprinkle a little extra cheese onto a heated nonstick skillet. Place the burrito seam-side down in the skillet and cook for about 3-4 minutes until the cheese forms a golden crust.
- Once golden and crispy, remove the burrito from the skillet. Slice in half to serve hot.


Leave a Reply